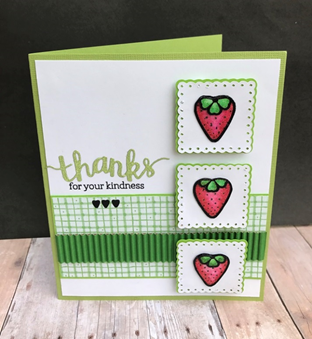
"Berry" Thankful Card
Posted by Amanda Reichard on 11th Aug 2017
Hello! I’m thrilled to have the opportunity to share my latest Krazy Kreations design with you. If you’re like me (and I’ll bet you are), then you do not like to let any of your crafting stash go to waste. Of course, this is especially true when it comes to our Krazy Kreations stash, right? This project stirred my creative juices to imagine the “leftover” pieces of the Krazy Kreations Layered Flowers 3 Outline Stickers. Instead of using the flower petals/leaves as they are originally intended, I used them to create strawberries for a thank you card.
To create this card:
1. I started with the best part: Making the strawberries!
a. Prepared the Glitter Paper: I used my fingers to burnish the glitter to make it smooth and add luster from the oils in my fingers.
b. Prepared the strawberries: I selected three leaves/petals from the Krazy Kreations Layered Flowers 3 Outline Stickers sheet to peel from the sticker sheet and adhere to white glitter paper. Using a Copic marker cap, I burnished the stickers onto the paper, ensuring the sticker was sealed to prevent the color from bleeding. I colored the strawberries with the lightest color of your alcohol marker combinations. I used Copic RV29 and the colorless blender. After coloring the images, I cut them out and used a black Sharpie to color the edges.
c. Prepared the tops of the strawberries: Then I selected three of the smallest flowers to peel from the sticker sheet and adhere to the white glitter paper and colored them using Copic G05, G14, and colorless blender. Then, I cut them out and used a black Sharpie to go around the edges. I adhered the whole flower at the top of the strawberry so that three of the petals are on top (and the other two hang off of the edge). I then flipped the strawberry over and trimmed off the extra petals so that the green top is the same shape as the strawberry. To finish it, I touched up the edges again with a black Sharpie.
2. I cut a piece of light green, heavy cardstock into 10” x 6” and folded it in half. (You could also use a pre-made card, if you prefer).
3. I cut a piece of white cardstock to 4 ¾” x 5 ¾” and adhered it to the card front, centered.
4. I selected a slightly different shade of green card stock and a coordinating patterned paper (plaid) to go across the bottom of the card. I cut the solid green piece to be 2 ¼” x 4 ¾” and the patterned piece to 2 1/8” x 4 5/8”. I adhered the plaid paper to the solid and adhered that about a half an inch from the bottom of the white card stock.
5. I also adhered a ¾” strip of corrugated paper across the patterned paper, about half an inch from the bottom of it. (You could also use ribbon or another type of dimensional paper, here).
6. To create the matted squares under the strawberries, I used my electric cutter. The white boxes are 2” square and the green ones are 2 1/8” square. (If you don’t have an electric cutting machine, you can use paper punches or your paper trimmer to cut simple matted squares). I adhered the white to the green cardstock and added the fun strawberries. I then used pop dots to adhere the squares to the card. I placed them about 1/8” apart from each other.
7.. To create the words, I used a die cut to cut out the “thanks” from green glitter paper and a stamp to imprint “for your kindness”, in black ink. (You could really use any phrase or quote you like, here).
8. Last but not least, I used the tiny centers of the smallest flower (these remain after removing the flower outline) as hearts underneath the words. See, nothing goes to waste!
I hope that my creation makes you smile and that you enjoy thinking of fun ways to use every piece of your Krazy Kreations stash!
Best wishes until next time,
Amanda
Krazy Kreations Supplies:
Copic Pen G14